In many cases, the requirement is to restrict Employee Success UpRaise access to certain Jiar users. There are multiple reasons for doing this. A few that we have come across frequently
Outsiders (non-employees) have access to Jira & companies do not want them to be able to access
Employee SuccessUpRaise.
Another use case for having restricted access is when you want to roll out
Employee SuccessUpRaise gradually.
Users want to allow or restrict
Employee SuccessUpRaise access to specific Jira group/s.
Employee Success UpRaise access can be configured through the setting in company directory under administration.
| Warning | icon | false
|---|
Following is applicable to the server versions 3UpRaise V3.6.8 & above |
Server version
of Employee Successof UpRaise
There are three possible options. Only one can be selected at a time. You can make use of these three options to manage access to Employee Success UpRaise for imported users. Read How to import Jira users to UpRaise? for more details. Access these options from general settings tab on settings page.
All users
User based access
Jira group based access
| Note | icon | false
|---|
By default, Employee SuccessUpRaise access will be set to "User based access", where only Jira admin and selected users by Jira admin (while onboarding Employee SuccessUpRaise) will have access to Employee SuccessUpRaise. |
All users
When you select all users option, every active Jira group member of imported Jira group/s will be able to access Employee SuccessUpRaise. All users except admin/super admin will be assigned the role of 'user', which can be later changed to admin/super admin if needed. Only Employee Success admin/super admin will have the permission to change someone's role. 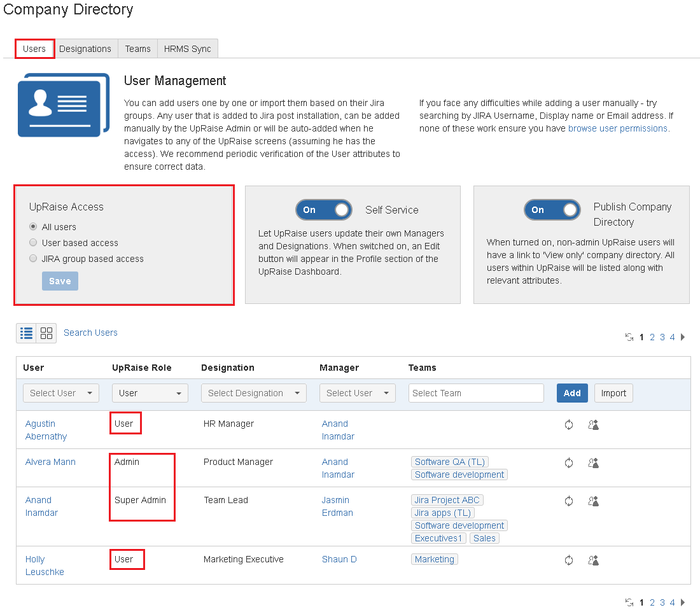
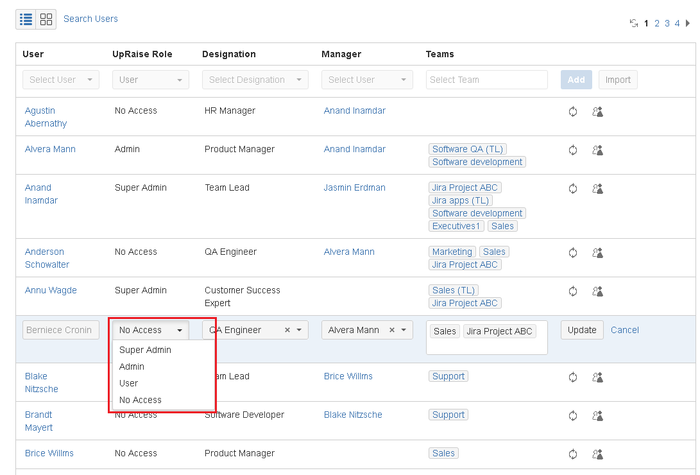
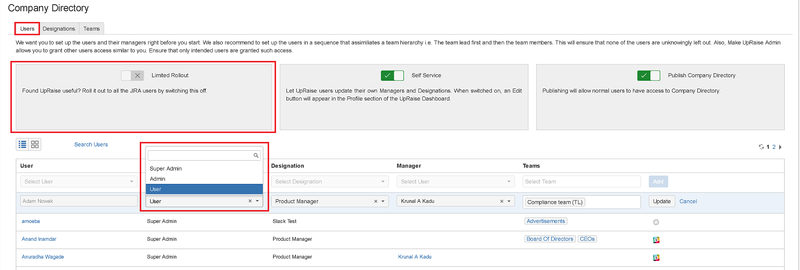
User based access
When you select user based access option, you are opting to choose access levels on a per user basis. When turning to this option, all imported users will be set to 'no access' except existing Employee Success UpRaise admin/super admin. You will need to make use of the "Employee Success UpRaise role" column to change user's role from No access to user/admin/super admin (refer Images below) & update. In this way, each user's Employee Success UpRaise role is dictated at the user level.
| Info | icon | false
|---|
This option is typically useful when the number of users in your company are not beyond say 200-500. After that it becomes difficult to manage access on a per user basis. |
e.g. In the below snap as user based access option is selected, all users except admin/super admin are marked with 'no access'.
| Note | icon | false
|---|
Note that the users who have no access role of Employee SuccessUpRaise- cannot see even the top Employee Successtop UpRaise menu & also cannot be used anywhere in continuous feedback, objectives or review forms. |
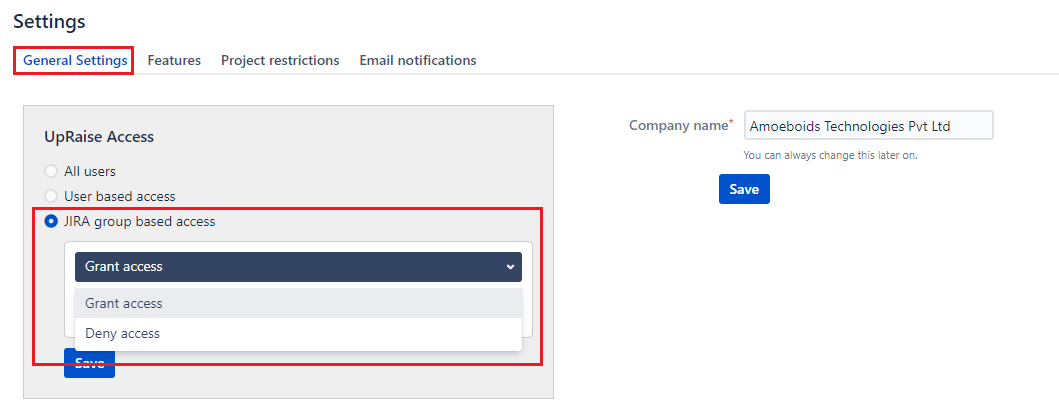
Jira group based access

| Info |
|---|
| icon | false |
|---|
This setting is the easiest way for companies with >500 users in Jira. It will let you control |
UpRaise access based on Jira group that user belongs to. |
Let us say you have Jira groups such as developers, project managers, leads etc. and you have imported all them to Employee SuccessUpRaise. You grant or deny access to the set of users by selecting these groups with deny access or grant access options. This will allow you to control Employee Success UpRaise access & to limit it to explicitly selected groups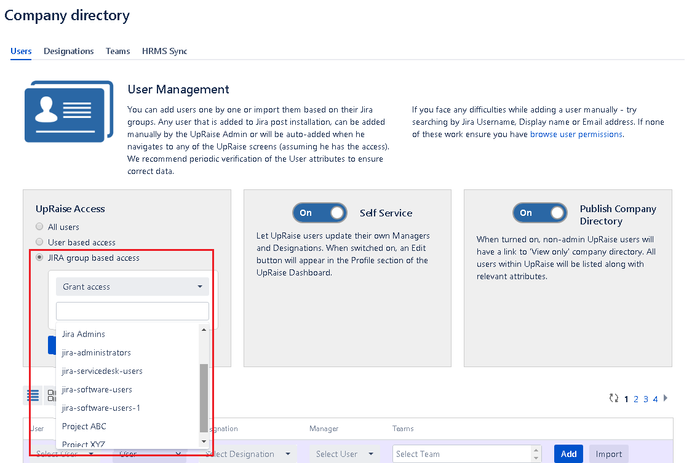
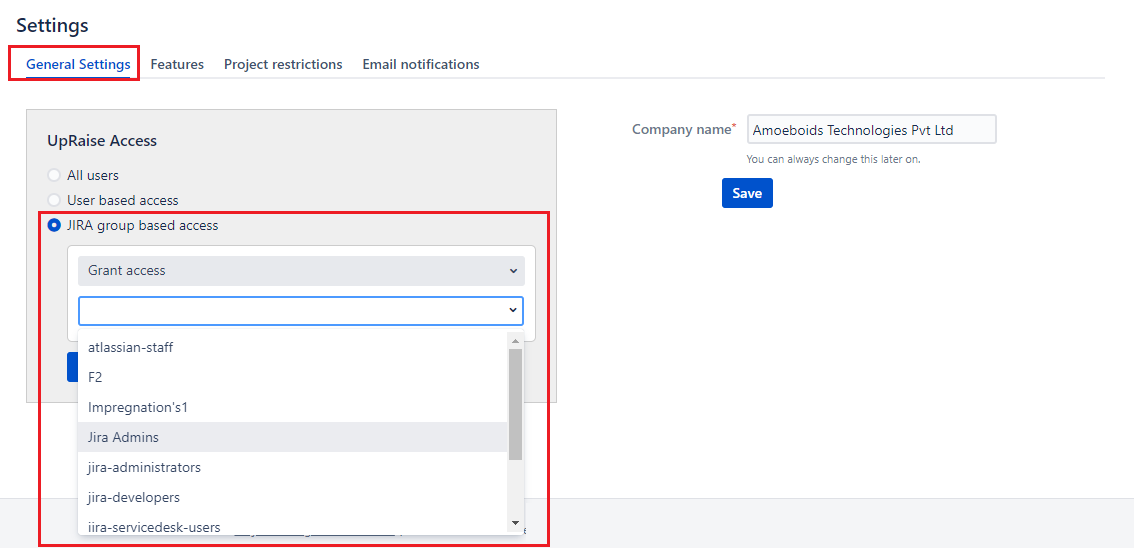
You can notice in the above image, if you select the first option called "grant access" then the selected groups will get access to Employee Success UpRaise and rest will be restricted from accessing Employee SuccessUpRaise. When you select "deny access" then selected groups are restricted to access and rest will get access. Once you select any option, you will get a drop-down list of imported Jira groups, you can make a selection and click on save.
| Note | icon | false
|---|
When using Group based access, you cannot grant or revoke access at individual level. e.g. if a user is assigned 'no access' because he belongs to the group that does not have access - only way to give him access is to a) change group access setting or b) change his group. At the user level, you won't be allowed to grant access. Same is true for when you want to revoke access. |
Cloud version of Employee Success
| Warning | ||
|---|---|---|
| ||
Following is applicable to the cloud version as well as server versions prior 3.6.8 release |
Turning off limited rollout means, Employee Success is accessible to all the Jira users. By default, limited rollout is turned on to ensure Employee Success is not made available to all the Jira users unknowingly.
When turned on, all users will have 'no access' role except Employee Success admin/super admin. You will need to make use of the "Employee Success role" column to change user's role from noaccess |
. |

| Info | ||
|---|---|---|
| ||
Note that the users who are assigned no access - cannot see the top Employee Success menu & also cannot be used anywhere in continuous feedback, objectives or forms. |
When limited rollout is turned off - all Jira users can see the top Employee Success menu. These users by default will be assigned the role of user which can be later changed to admin/super admin if needed. Only Employee Success admin/super admin has the access to change someone's role.
On this page
| Table of Contents |
|---|
In this section
| Child pages (Children Display) | ||
|---|---|---|
|